Best Practices for Direct Deposit & ACH Changes
I How can you protect yourself? NEOnet, along with its member districts, have come up with best practices to help reduce and eliminate fraud.
- ALWAYS pre-note for direct deposit. If someone insists you not send a pre-note, that is a red flag.
- Do not store your direct deposit form on your public website as scammers can easily access them.
- Have a policy in place for these changes, such as:
- All changes to direct deposits must be made in person and they must show an ID
- If changes do not need to be in person, all changes to direct deposits must be followed up with the employee by using their school email address or phone to confirm the change is legitimate.
- For ACH vendor payments, best practices include:
- Only allow the vendor to send the change form via fax or US Mail.
- Someone in the central office should call a “known” number for the vendor to verify the information.
- Use a service such as Positive Pay to ensure no fraudulent checks are cashed.
- Put an approval process in place for ACH payments via your bank. This adds a second layer of protection/control and requires that every payment uploaded to the bank must be approved by a second person.
Important Updates on Web-GAAP Functionality
New URL for Web-GAAP:
- The updated URL for Web-GAAP is now https://webgaap.ohioauditor.gov.
Report Generation:
- The ability to generate Web-GAAP reports using Excel Binary format is no longer available. Instead, you can now use the Excel HTML format.
Report Formatting:
- The formatting of the reports has changed. We are actively working on improving their appearance to enhance your experience.
eFP Highlights of the Updates and Resolved Issues from the July 23.10.9 Release:
Vendor Punchout Order Errors:
- Corrected errors and improved logging for Vendor Punchout orders.
EAC Prior Year W2s Display Issue:
- Fixed display issue for prior year W2s in the new Employee Access Center (EAC).
EAC Paycheck Voucher Bank Information:
- Corrected the display of bank information on paycheck vouchers in the new EAC.
Check History Report Error:
- Fixed error in Check History report related to voided checks.
Trial Balance Enhanced Report:
- Corrected the inclusion of negative checks for revenue accounts in the Trial Balance – Enhanced report.
Billing and Receipts Batch Invoices Entry Error:
- Fixed database error in Batch Invoices page for miscellaneous billing.
Payroll Redistribution Benefit Charging:
- Resolved issue with benefit budget codes during payroll redistribution preview.
Terminated Employee Login for SSO Districts:
- Provided a dedicated URL for terminated employees to log in to EAC in SSO-enabled districts.
Budget Preparation Recommended Worksheet Report:
- Corrected formatting issues in the Budget Preparation Recommended Worksheet report when output to Excel.
EAC What If Calculator Deductions:
- Fixed error in the What If Paycheck Calculator when no deductions were selected.
941 Quarterly Federal Tax Report Editing:
- Enhanced the 941 Quarterly Federal Tax Report to allow data editing, saving, and historical storage.
Unlimited Dependent Care and Pension Codes in W2 File:
- Allowed unlimited dependent care and pension codes in the Create Employee W2 File process.
How are AP Invoicing Dates in USAS used at FYE?
When you receive an invoice from a vendor dated in the new fiscal year but includes the billing for goods/services used in FY24, there are dates entered in USAS when processing invoices that should be considered.
For example, when creating an AP Invoice in USAS, the invoice date and the received date entered become important for GAAP purposes to ensure the expense is recorded in the correct fiscal period. These dates also determine what items will be reported as payable amounts in FY24. The Account Payable Report is used to capture these Payables for GAAP.
When entering an Invoice in USAS, the Date will default to the current date. This is the transaction date used in the system and must be a date in an open posting period.
When you receive an invoice in July that is dated in a closed posting period (i.e., invoice with a June date), you may choose to enter this date in the Vendor Invoice Date field. The Vendor Invoice Date does not need to be in an open posting period as it is just being used to track the physical date of the invoice.
Another important date field is the Received Date on the item’s invoice line number.
The Received date records ‘when’ the goods/services were received by the vendor. In USAS, this date may be entered by the user or when left blank, USAS will default to using the (invoice) Date.
Adding New Employees into USPS Made Easy!
It’s a new fiscal year, and hiring new employees comes with it. Now, where to start? Entering all the necessary information into USPS can be quite overwhelming. Fortunately, there are options to help simplify the process! These options include:
- Add the new employee records using Core options. This option allows records to be added individually by selecting the appropriate option from the dropdown.
- The first Core record that needs to be added is Employee. Once the Employee record is created, go back to Core and select, create, and save all the other records that apply.
- Add the new employee records using the Employee Dashboard. This option lists all possible records that may need to be created. Any record that applies can be selected from the list on the employee’s dashboard.
- The first record that needs to be added is the Employee record. To add the Employee record, go to Core>Employee. Once the Employee record is added, use the search option to locate the employee and be taken to their dashboard. Then, use the list provided to assist in adding any records that apply to the employee.
- Add the new employee records using templates and Mass Load. This option allows records to be created using a load file/spreadsheet.
- The load file must contain specific column headings and certain information must be included.
- Once the load file has been created, the file needs to be saved in CSV format.
- Using the Utilities>Mass Load option, browse to locate the CSV load file and select the appropriate importable entity. Click Load. The Import Results grid will display the number of records loaded and the number of errors encountered. If errors occur, use the load error file to make necessary corrections. Save that file in CSV format and step through the load process again.
- Template load files can be found in the Public Shared USPS Reports Library for assistance in creating the load file.
- Add the new employee records using the Employee Onboarding option in Workflows.
- This option allows employee records to be entered in a separate system called Employee Onboarding. The information entered using Employee Onboarding remains in this system until the Complete Task option is selected. At that time, the records are created in payroll and can be viewed in the Employee Dashboard or the Core options. The Workflows option does require some additional setup. If you are currently not utilizing this feature and would like to, please reach out to NEOnet for assistance in getting this option installed.
Remember…
Don’t forget to use those Templates! Once the record has been created, click the ‘Choose Template’ option (located in the upper right-hand corner) and select the appropriate template from the dropdown. Once the template is selected, the values from that template will auto-populate on the employee’s record. Make any necessary updates and click Save.
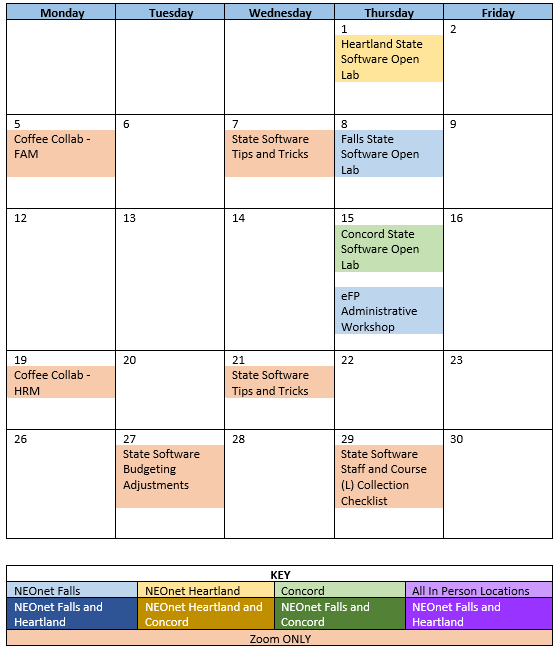
Trainings/Meetings in August